Showing posts with label diy. Show all posts

Sunday, August 28, 2011

Wedding projects part 4


I really wanted some fun shoes. I kept looking for green or purple shoes, but the only ones I found had crazy high heels (no thank you!) or were super ugly. So I ended up settling on some simple silver satin low heels.

They were fine, but the more I thought about it, the more I wanted them to be a little more fun & sparkly. So with a little bit of green netting & some Swarovski crystals, I made my wedding shoes one-of-a-kind!


Photos by Mia Jade Photography.

Tuesday, August 9, 2011

Wedding projects part 2


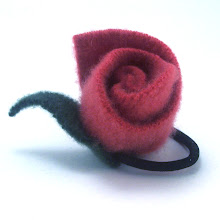
The next project I tackled was corsages for our moms & grandmas. I looked at lots of pictures online to try to get inspiration, but ultimately decided to just do one big flower in the same style that I make for pins, just bigger.
Everyone said that they wanted a wrist corsage, so I had to find a base. Fortunately, I know the awesome people over at Market Blooms at the North Market here in Columbus. They were kind enough to let me look through a florist catalog and find some fabulous 'pearl' bracelet bases! (I had no idea that there were so many options - I thought I'd end up with an elastic band, like I got for prom.)


I made all of them in one of the purples that I used for my bouquet, with just a little sparkle in the center. I used green ribbon to create some leaves - I didn't want the corsages to be to hot!
I also added some of the lily-of-the-valley to the moms corsages. I'm so happy with the way they turned out!


Thursday, August 4, 2011

Wedding projects part 1

Shockingly enough, I didn't manage a post before my wedding. While I'm sad about that, I'm really happy to be done with wedding planning - and happy that I didn't kill anyone during the process.
All in all, it was an awesome wedding. It would have been hard to tell that we switched our ceremony from outside to inside a scant 2 hours before we were scheduled to start. Everyone had a great time and loved all of the little things that made the wedding very 'us.'

One of the first projects I worked on for the wedding was making my bouquet, and bouquets for my four lovely best women. This was also my most time-consuming project, but fortunately I was able to start in January. First I made the roses out of recycled sweaters. I used 3 shades of purple, white, and green. My bouquet has 20 flowers, and each of my girls bouquets had 10, so that took some time.
Then I attached each rose to a 'stem' of aluminum sculpture wire, and sewed on a green base. I didn't cover the whole wire, just about 3 - 4 inches.


For my girls, I ended up creating some leaves in a citrus-y green, and wiring them with floral wire. For my bouquet, I was lucky enough to be able to incorporate some faux lillies-of-the-valley that my mom had pinned to her wedding dress.

I also decided that I wanted just a bit of sparkle, so I wired some clear Czech crystals onto copper beading wire. I wrapped all of them in the same style, with a heavy white brocade-type material and tied with a thin spring green ribbon.
I spent a crazy amount of time working on these, but I love them! Plus, now I get to keep it forever as a work of art.


Photos were taken by the fabulous Mia Jade Photography.

Monday, August 9, 2010

Recycled Wine Bottle Torch


I want to make these for my own backyard!! Our current torches are wretched, useless things, and these wine bottles are so much more attractive.

Full disclosure: this post is a shameless steal from Erik Anderson. You can read his complete post (with assembly instructions) here: http://www.gerardotandco.com/blog/recycled-bottle-torch/


Recycled Wine Bottle Torch How To

Materials Needed:

1. Empty Wine Bottle (You can use any bottle you like as long as it’s glass and the neck is 1” in diameter. Be clever!)
2. Teflon Tape 1/2”
3. Copper Top Plate Connector (threaded for 3/8”-16 thread rod)
4. 1” Split Ring Hanger (threaded for 3/8”-16 thread rod)
5. 1/2” x 3/8” Copper Coupling
6. 1/2” Copper Cap
7. Two Hex Nuts (threaded for 3/8”-16 thread rod)
8. Two #10 x 1” Zinc Plated Wood Screws (if you’re mounting it to wood)
9. 3/8”-16 Zinc Plated Threaded Rod (I bought a 3’ rod and cut it down to 8, 4-1/2” rods with a hacksaw.)
10. Tiki Replacement Wick
11. Torch Fuel (For safety reasons, only use fuel made specifically for outdoor torches. i.e. Tiki brand)


Safety Note: This is for outdoor use only. Tiki brand recommends that the wick never be set higher than 1/4-inch, and I recommend that you exercise the same discretion and common sense that you would with any small open flame. Never leave your torches unattended.

Tuesday, May 11, 2010

Rain Barrel Part 3: The Watering System


So the rain barrel is set up and ready to use! The final challenge of installation was to make an easy to use, practical system to water our vegetable garden. So in addition to the rain barrel, I also bought a hose splitter and 2 pre-measured lengths of drip tape.

The tricky part? Getting hoses the right length to carry the water from the rain barrel to the start of the raised beds. Fortunately, the hardware store has all kinds of neat tools and tricks.

I needed 2 lengths of garden hose - 1 about 7 ft, the other around 14. I bought one 25 ft hose and two hose end replacements, one male and one female. *Make sure you are buying the same size of hose and replacement parts!!*


Next, I cut the hose to the right length. It's important to make this cut as straight as possible!

Wiggling the hose replacement part into place is a little tricky, but it can be done! Remember to put the outer part (silver in these pictures) onto the hose first! Otherwise, you'll have to smack yourself in the head - just like I did.


Tighten up the screws, and you should be ready to go!


The great thing about the drip tape system is that we can turn it on and walk away for an hour. Our plants will get a slow, steady & gentle watering, and we won't be watering anything we don't need to be (like the weeds between the raised bed and our fence.)


Big thanks to The Rain Brothers for delivering my rain barrel and giving lots of advice! If you live in the Columbus area, I highly recommend them!
http://www.rainbrothers.com/

Sunday, April 25, 2010

Rain Barrel Installation: Building a Stand


It's a beautiful Sunday morning in my backyard - the birds are singing, the lilacs smell amazing - and I can see our newly installed rain barrel. While it was a big project, now that it's all done, I feel that I can say that most people would be able to get this done with a little help from a friend. Doing a project together is always more fun than going it alone anyway.

So, the first step to installing a rain barrel is building a stand - unless you live on a hill. Since rain barrels have no water pressure, elevating them uses gravity to push water through the hose. We decided to make our stand about 2 ft high.


Supplies:
1 - 4" x 4" x 8'
2" x 4" (we have a bunch of these that were used for a project & then disassembled. We ended up using about 28' worth.)
Outdoor rated screws - 3" long
Wood stain/treatment - we used a color called Canyon Brown
Table saw
Drill/screwdriver
Paintbrush
Measuring tape
T-square (or something that helps you see when things are at nice 90 degree angles)

Unfortunately, Lowe's can't cut 4" x 4"s. We used our table saw, but quite possibly you could find a local lumber yard that would be willing to help you out for a small fee.

First, we built the base. Obviously, the 4" x 4"s were the legs.


We left the front bottom open because eventually, overflow from the gutter will end up coming out there. Our cuts weren't perfectly straight, but they were close enough. Even though we used our angle checker thing-a-ma-bob, we still had to tweak it a little - but that was easy enough.


Then we added the top. We left spaces in between the 2" to keep the weight down a little, and to keep water from puddling up on top. I'm sure you could use 1" x 4"s instead, we just have the 2"x 4"s already, and we like to reuse.


Finally, we stained the whole thing - we want it to be pretty water-resistant & last a long time, so we covered the stand pretty thoroughly.
Huge thanks to Steve for all of his work on this project. He is patient & thoughtful, and I couldn't ask for a better partner for any kind of project!

Up next: Installing the rain barrel!